Intro to Rails
Objectives
- Identify and describe the principles of Rails
- Use Rails generators to create an app with models and controllers.
- Use embedded Ruby in Rails templates
- Utilize the Active Record ORM to manipulate data
Principles of Rails
- DRY - keep your code DRY and use concise, consistent code.
- Convention over configuration - Rails is built using sensible defaults, which speeds development and means that there is less code to maintain.
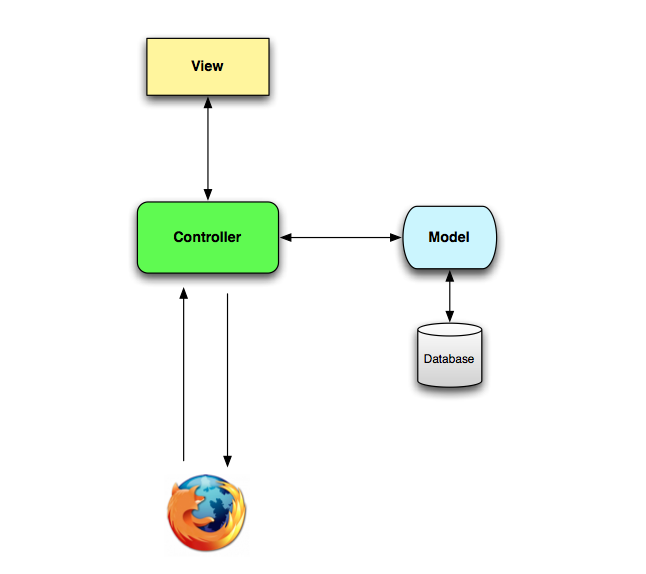
Rails uses (and for the most part, forces you to adhere to) an MVC architecture. We used MVC when creating Express applications.
Model - The model refers to the data objects that we use. It's the object oriented approach to design. The data in our database will be the most common type of object that we'll put there.
View - The view is the Presentation layer. It's what the user sees and interacts with, essentially the web pages. The HTML, CSS, and front-end JavaScript.
Controller - The controller will make decisions based on the request and then control what happens in response. It controls the interaction with our models and with our views.
More info about Rails: http://rubyonrails.org/
Create a Rails App
Basic creation of an app is very simple:
rails new name_of_the_app
If we want to use a different database (such as PostgreSQL) we need to specify the database using the -d flag followed by the database. By default, Rails uses SQLite, which is unideal for web applications deployed to ephemeral file systems. We'll specify postgresql for our Rails apps.
rails new name_of_the_app -d postgresql
Hopefully this is obvious, but replace name_of_the_app with the name of your project. Also, running this command will automatically create a new folder, so it's unnecessary to create another folder for a Rails project.
If you've already created a folder though, you can initialize the app in a current directory by running:
rails new ./ -d postgresql
SPECIAL NOTE FOR UBUNTU/DEBIAN USERS
You might need to install libpq-dev and build-essential:
sudo apt-get install libpq-dev build-essential
Rails File Structure
The main directory that we'll be working in is the app directory which contains our models, views, and controllers.

More info: rails guides - getting started
Bundler / GemFile
Bundler is a separate gem from Rails, and can be used outside of Rails, but Rails is going to depend on it to manage the RubyGems that our application needs.
The first thing that you need to know is that there are two files that matter to bundler:
GemFile- A list of all gems your app needs to work (your dependencies).GemFile.lock- Used internally to track installed gems. NEVER EDIT THIS FILE!!
To set up an app we can run bundle install which will download and install any gems listed in the GemFile.
Note: After the server is running you'll need to restart it if you add any additionally gems before they will be loaded.
Database config
The configuration for the database can be found in (Your project name)/config/database.yml This is where you can find the name of your database, and change database options.
NOTE FOR UBUNTU/DEBIAN USERS
You might need to specify the host, user and password as well. Just add the following to config/database.yml.
host: localhost
user: YOUR USERNAME HERE
password: YOUR DATABASE PASSWORD HERE
After all this, type the following to create your database.
rails db:create
Start a server
To start the server we just type
rails server
Or the equivalent but shorter...
rails s
This will start a server on port 3000.
Since we're using PostgreSQL, we'll need a database for our application. By default, the development database Rails looks for is called name_of_the_app_development. You can verify the name by looking in (your project name)/config/database.yml. Include the username and password as well, if your local database has a username and password.
You'll want to create this database using the command rails db:create so that Rails can find the database. This automatically creates your databases.
Here are some other rake commands you'll want to know about for database management.
rails db:drop # drop database
rails db:migrate # run migrations
rails db:rollback # rollback one migration
rails db:rollback STEP=n # rollback 'n' migrations
Generators
Rails includes a few generators which are command line tools used to create files for us. This automates the repetitive task of creating some of the more common files we'll need to make when building a rails app. To run a generator we type rails generate or...
rails g
...for short
The two that we will be using regularly are:
rails g controller controller_name- create a controllerrails g model model_name- create a model
We will touch on actual usage of both of these.
More info: Rails guides - command-line tools
Create a controller
controllers and the actions contained within are the starting point for the back-end code that will be executed when a user visits a particular page/URL.
To create a controller we use the controller generator:
rails g controller main
This will create a controller called "MainController" in the file app/controllers/main_controller.rb. To create actions we simply define methods inside of the controller like this.
class MainController < ApplicationController

  def index
  end

  def about
  end

end
Note: You'll find that having to write index, show, edit, and other actions will become tedious. Instead, you can define the actions to the generator and Rails will make them for you.
rails g controller main index about
The controller generator also creates views, a helpers file, and coffee/scss files. We won't go too deep into these (with the exception of SASS), but you're welcome to use helpers and CoffeeScript if you wish.
Routing
Routing is used to route URLs to specific controllers/actions. So when a user types in /about we want it to go to the about action of the main controller. To specify this we use the # symbol so for our about action it'd be main#about.
Routes consist of an HTTP verb and a path. GET /about is not the same as POST /about
Routes are contained in the config/routes.rb file.
To list all routes you can run the following command:
rake routes
config/routes.rb
  get 'main/index'
  get 'main/about'
While these routes are fine, we're going to change them around a bit.
  root 'main#index'
  get 'about' => 'main#about'
- root - A special route known as the "root route". Every app only has one root route which is used for the home page of the site, AKA what will display when we go to:
http://localhost:3000 - get - get defines a new
GETroute. Any time you go to a url by typing it into the URL bar it is accessing aGETroute. Defining routes is simply the url they will type followed by a hash-rocket (=>) that points at the controller#action you want it to execute (main#about).
More Routing Examples
# a single route to a single controller#action
get 'contact' => 'main#contact'

# same as above, only different syntax
get 'contact', to: 'main#contact'

# similar to above, only with a URL parameter
get 'users/:id', to: 'users#show'

# similar to above, only changing the name of the path helper
get 'users/:id', to: 'users#show', as: 'profile'

# resources routing, used to quickly declare RESTful routes for a resource
resources :photos

# resource routing, using `only` to define the specific RESTful routes
resources :photos, only: [:index, :show]

# resource routing, using `except` to omit RESTful routes
resources :photos, except: [:destroy]

# nested routes
resources: :posts do
  resources :comments
end
Note that there are more examples for customizing routes in the config/routes.rb file, as well as the Rails Routing documentation. Note that there is a "Rails way" for routing that makes your life easier.
Views
By default, actions in rails will render a view named ACTION_NAME.html.erb in the views/CONTROLLER_NAME directory.
For example, the actions we defined above will load views/main/index.html.erb and views/main/about.html.erb respectively.
However, we can manually render a view by using the render method, if needed. Example:
class MainController < ApplicationController

  def about
    render :about
  end

end
For rendering text, JSON, other templates, etc., you can take a look at the Rails Documentation on creating responses. Trust us, it's good.
ERb
Rails uses a templating engine called ERb (Embedded Ruby). It allows us to mix HTML and ruby code to create dynamic templates. It supports the majority of the major components of the ruby language.
To designate ruby code we use "magic tags" <% #ruby code goes here %>. Any code between those tags will be executed on the server before the HTML content is served to the user. If you want the result of the code to output you add a = inside the tag like this: <%= 5+5 %> would insert the number "10" into the HTML.
Example
<% (1..10).each do |i| %>
<%= i %><br>
<% end %>
Notice only the middle line of code has an equal sign (=). This is because this is the only line that needs to putput anything. The each loop and end tag are just used for control flow.
This could would output the following HTML:
1<br>
2<br>
3<br>
4<br>
5<br>
6<br>
7<br>
8<br>
9<br>
10<br>
This HTML is then sent to the user's web browser to be rendered.
Passing data from controllers to views
Inside a controller action
def index
  @taco = "Hello instance taco!"
  @array = [1,2,3]
end
Inside a view
<%= @taco %>
<%= @array.inspect %>

<% @array.each do |item| %>
<%= @array %>
<% end %>
Note that we can pass data from a controller action to a view by defining the variables as instance variables. This is required because instance variables only exist in the action. By declaring them as instance variables, the variables are passed to the view.
More info here: rails guides layouts and rendering
Models / ORM / Active Record
Rails provides a tool called Active Record, which is an ORM (Object Relational Mapper) that maps database tables to object-oriented models.
Models are used for interacting with the database. Essentially each model represents a database table.
MODELS ARE ALWAYS SINGULAR!!! If you have a collection of photos, the model name would be photo. This is very important. If you get it wrong, things will break.
Example
To create a Tweet model with the following attributes:
- username - string (varchar)
- content - text
We simply run:
rails g model tweet username:string content:text
This will create a migration file in the db/migrations directory and a model in the app/models directory.
more info: Rails Guide - Active Record
Migrations
Migrations are used to create the schema of our database. When we generate a model it creates a migration file that will automatically create the correct database table.
To run all pending migrations just type rails db:migrate and the new table will be created.
Migrations can also be used to make other database modifications. (eg adding, removing, renaming columns)
More info: Rails guides - migrations
Interacting with data
We can directly interact with the data in our database using our model. This is typically done in the controller action.
Rails Guides - Active Record CRUD
Interactive Console
The rails interactive console can be loaded to test code and interact with our rails app directly. To start it you simply run rails console or rails c from the command line and it loads an interactive terminal irb with the rails app initialized. This is generally a good idea because you can test your modules using Active Record.
Basic Examples
Tweet.all # lists all tweets
Tweet.create(content: 'This is my first tweet', username: 'Brian')
# alternative create syntax, using a create block
Tweet.create do |t|
  t.content = 'Rails make development so fast!'
  t.username = 'EveryStartup'
end
Tweet.all
Tweet.first
Tweet.last
Tweet.where(username: 'Brian')

t = Tweet.find(1)
t.username = 'Josh'
t.save

t = Tweet.new
t.username = 'Daniel'
t.content = 'Hello this is a tweet too'
t.save

Tweet.where(username: ['Daniel', 'Josh'])

Tweet.count
Tweet.all
Instant REST
A reminder from above: Rails conventions allow us to create applications quickly. As an example, we're going to create a RESTful app using the Tweet model. A very useful way to create these routes is by using resources.
config/routes.rb
resources :tweets
Using resources :tweets will make a set of RESTful routes with a base URL of tweets. Run rake routes to see these routes.
Note that the routes will also include default controller actions. While we can override these, we'll be fighting against the Rails opinions if we do. So let's make a controller to reflect these actions.
rails g controller tweets index new edit show
Note that the model is singular, the controllers/routes are plural. VERY IMPORTANT
In controllers/tweets_controller.rb
class TweetsController < ApplicationController
  def index
    @tweets = Tweet.all
  end

  def create
    Tweet.create(tweet_params)
    redirect_to tweets_path
  end

  def new
    @tweet = Tweet.new
  end

  def edit
    @tweet = Tweet.find(params[:id])
  end

  def show
    @tweet = Tweet.find(params[:id])
    # render json: params
  end

  def update
    t = Tweet.find(params[:id])
    t.update(tweet_params)
    redirect_to tweets_path
  end

  def destroy
    Tweet.find(params[:id]).delete
    redirect_to tweets_path
  end

  private

  # this is used to prevent mass-assignment of parameters into ActiveRecord models
  def tweet_params
    params.require(:tweet).permit(:content, :username)
  end
end
Handy Methods for Views
Rails provides a lot of helper methods, most handily link_to and form_for, as well as methods that produce the links. Note that we can override the names of these helpers by using as: when creating routes.
# link helpers
tweets_path
tweet_path(tweet)
tweet
new_tweet_path
edit_tweet_path(tweet)
<%= link_to "Edit Tweet", edit_tweet_path(tweet), class: 'btn btn-default' %>

<%= form_for @tweet do |t| %>
  <div>
  <%= t.label :content %>
  <%= t.text_area :content %>
  </div>

  <div>
  <%= t.label :username %>
  <%= t.text_field :username %>
  </div>

  <%= t.submit %>
<% end %>


# An easier helper is bootstrap_form, which can be installed by including the following line in your Gemfile:

# gem 'bootstrap_form'

# then run 'bundle install' and include the Bootstrap CDN links in layouts/application.html.erb

<%= bootstrap_form_for @tweet do |t| %>
  <%= t.text_area :content %>
  <%= t.text_field :username %>

  <%= t.primary %>
<% end %>
Note that if we create a form helper on an edit page, the helper automatically makes assumptions about the form. One of these assumptions is to provide a hidden _method field that describes the method that should be used on submission. This is the Rails workaround to sending PUT and DELETE requests!
Note that we can add a method attribute to links as well, using a URL helper. Here's an example.
<%= link_to "Delete Tweet", tweet_path(tweet), method: :delete, class: 'btn btn-danger' %>
Note that this is made possible by a piece of JavaScript called rails.js running on the page.