Websockets with socket.io
Objectives
- Describe what real time means, and how channels & open sockets push data to clients
- Set up websockets on the server side
- Use jQuery to update the client side
Getting Started
Grab the starter code from here: https://github.com/wdi-sg/socket-io-twitter-stream
Web basics recap
Let's take it back and talk about how the web works. In very simple terms: you have a client - a program that can make requests to the web - and a server - a computer somewhere that holds information/code. When you want some information, your browser sends a request to get some data and then the server responds. This can be with a GET request or an AJAX request, but in essence, the client is always saying "give me some data".
What are the issues with this?
Well, the client is in 'control' - the server might have updates, but the client doesn't know about them - and the client has to request information it may not be familiar with.
Alas! In comes polling! The client can keep 'polling' the server to see if it has any more data.
Short polling (AJAX based timer):
function doShortPoll(){
    $.post('ajax/test.html', function(data) {
        alert(data);  // process results here
        setTimeout(doPoll,5000);
    });
}
...Or, long polling. This method opens connection with the server, and the server notifies client-side when data is updated:
function doLongPoll(){
    $.ajax({ url: "server", success: function(data){
        //Update your dashboard gauge
        salesGauge.setValue(data.value);
    }, dataType: "json", complete: poll, timeout: 30000 });
}
Many different types of applications could use these polling techniques. For example, a chat room in an app that helps you attain highly desirable concert tickets by polling a ticket distributor so you can be notified first when tickets are available.
What are the issues with polling?
It's slow! Polling every n seconds isn't ideal, and if you poll too often, your bandwidth will go through the roof and slow your application down.
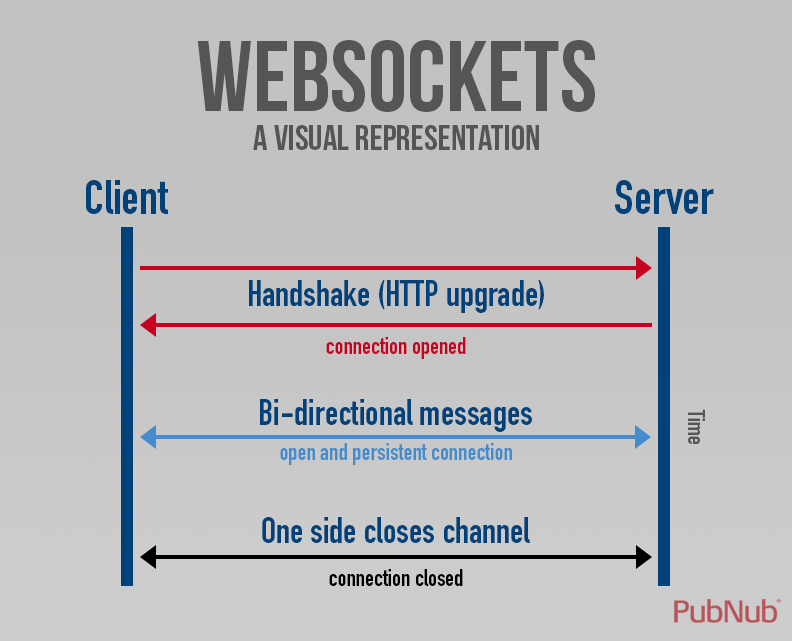
Enter Websockets
WebSockets solves all this. It maintains an open connection from Server <-> Client that we can use to 'push' information and get information, constantly, like push notifications on your phone (Gmail through Mail.app example).
Unlike HTTP requests, once a connection is established with websockets, you don't get continuous meta data like types, user-agents, cookies, dates, etc.
Installing WebSockets
We're going to add functionality to our application that will pull a constant stream of tweets from Twitter's API. First thing we need is to install the socket.io package. Jump into the starter code folder and:
npm install --save socket.io
Then, require it in our app with a few changes. First let's add a new require for the http module which gives us the server that socket.io needs to listen to. In app.js
var express = require('express');
var app = express();
var http  = require('http').createServer(app);
What's the difference between app & require('http')
This second way - creating an HTTP server yourself instead of having Express create one for you - is useful if you want to reuse the HTTP server, for example to run socket.io within the same HTTP server instance:
We need change at the bottom from app to http:
http.listen(port);
Also, add to app.js below the http variable:
var io = require('socket.io')(http);
Add Twitter Streaming API
Great! We're also going to using another module called twit to use with the Twitter Streaming API.
npm install --save twit
And add to your app.js at the top:
var Twit = require('twit');
Setting up our Twitter app
To make any of our apps work with Twitter, we need to declare our app as a Twitter application using apps.twitter.com.
Let's go to Twitter and create a new 'app':
- Name: express-twitter-stream (you'll have to change this to something unique)
- Description: Small app to stream tweets from Twitter.
- Website: http://127.0.0.1
Then, navigate to Keys and Access Tokens, generate My Access Token, and copy the keys into a .env file like so:
TWITTER_CONSUMER_KEY=insertkeyhere
TWITTER_CONSUMER_SECRET=insertkeyhere
TWITTER_ACCESS_TOKEN=insertkeyhere
TWITTER_ACCESS_TOKEN_SECRET=insertkeyhere
Instantiate new Twitter
In JS, we can access environment variables using the following syntax:
process.env.VARIABLE_NAME
Create new Twit client in app.js:
var twitter = new Twit({
  consumer_key: process.env.TWITTER_CONSUMER_KEY,
  consumer_secret: process.env.TWITTER_CONSUMER_SECRET,
  access_token: process.env.TWITTER_ACCESS_TOKEN,
  access_token_secret: process.env.TWITTER_ACCESS_TOKEN_SECRET
});
You can console log this to see if it has worked. Don't forget to run foreman or install dotenv in order to load our environment variables.
console.log(twitter);
Get Tweets with a websocket
Now we set up our websocket on the server-side. There are a number of reserved words - connect, connection, message, disconnect - that can't be used elsewhere. We want our tweets to stream when we connect to the page so we open a connect channel.
Inside, we set up our tweet socket and finally we emit our tweet on the tweets channel.
io.on('connect', function(socket) {
  var stream = twitter.stream('statuses/filter', { track: 'javascript' });

  stream.on('tweet', function(tweet) {
    socket.emit('tweets', tweet);
  });
});
Note that socket refers to an individual connection, while io refers to all socket connections. Keep this in mind when emitting data.
Client Side
Now that's the server side sorted, now let's do the client. Open up our layout.ejs and add a few things - jQuery, our socket.io library and an empty JS file:
<script src="https://code.jquery.com/jquery-2.1.1.js"></script>
<script src="/socket.io/socket.io.js"></script>
<script src="/js/script.js"></script>
Notice that the path is relative - that's being done for you by Node.
Let's check in Chrome's console
Open up Chrome's console using cmd+alt+j
> io
< function lookup(uri,opts){if(typeof uri=="object"){opts=uri;uri=undefined}opts=opts||{};var parsed=url(uri);var source=parsed.source;var id=parsed.id;var io;if(opts.forceNew||opts["force new connection"]||false===opts.multiplex){debug("ignoring socket cache for %s",source);io=Manager(source,opts)}else{if(!cache[id]){debug("new io instance for %s",source);cache[id]=Manager(source,opts)}io=cache[id]}return io.socket(parsed.path)}
Then in script.js, add in our receiving code:
var socket = io();

socket.on('connect', function() {
  console.log('Connected!');
});

$(function() {
  socket.on('tweets', function(tweet) {
    console.log(tweet);
  });
});
Notice there's no URL provided to io(), since it defaults to trying to connect to the host that serves the page.
We use one of the reserved events ('connect') to log out the fact we are connected, and then, we hook up to the tweets channel and start logging out what is received.
This is great! We now have own tweets streaming but only to the console. Let's get it on the page with some jQuery.
Back to the server-side
Go back to our app.js and tidy up the tweet data we're sending through:
io.on('connect', function(socket) {
  var stream = twitter.stream('statuses/filter', { track: 'javascript' });

  stream.on('tweet', function(tweet) {
    var data = {};
    data.name = tweet.user.name;
    data.screen_name = tweet.user.screen_name;
    data.text = tweet.text;
    data.user_profile_image = tweet.user.profile_image_url;
    socket.emit('tweets', data);
  });
});
Note the change to: socket.emit('tweets', data);
Let's change the views
Add a container in index.ejs:
<div id="tweet-container"></div>
Render the tweets with jQuery and amend script.js:
var socket = io();

socket.on('connect', function() {
  console.log('Connected!');
});

$(function() {
  socket.on('tweets', function(tweet) {
    var $tweetName = $('<h2></h2>').text(tweet.text);
    var $tweetAuthor = $('<p></p>').text(tweet.screen_name);
    var $tweetContainer = $('<div class="well"></div>').append($tweetName).append($tweetAuthor);
    $('#tweet-container').prepend($tweetContainer);
  });
});
The Twitter stream should now be working. Try opening up another browser window and see all the browser windows update in real time.
socket.io Cheat Sheet
// sending to sender-client only
socket.emit('message', "this is a test");

// sending to all clients, include sender
io.emit('message', "this is a test");

// sending to all clients except sender
socket.broadcast.emit('message', "this is a test");

// sending to all clients in 'game' room(channel) except sender
socket.broadcast.to('game').emit('message', 'nice game');

// sending to all clients in 'game' room(channel), include sender
io.in('game').emit('message', 'cool game');

// sending to sender client, only if they are in 'game' room(channel)
socket.to('game').emit('message', 'enjoy the game');

// sending to all clients in namespace 'myNamespace', include sender
io.of('myNamespace').emit('message', 'gg');

// sending to individual socketid
socket.broadcast.to(socketid).emit('message', 'for your eyes only');
Additional Resources
-
- Great example of two-way event emission
How Facebook and Gmail implement real time notifications
- Note that websockets are a HTML5 spec, and there must be fallbacks (like long polling) for browsers that don't support websockets.