CSS Selectors
Objectives
- Describe the syntactical and functional relationship between selectors, properties, and values
- Style all elements of a particular HTML element on a web page
- Describe the difference between class and id selectors
- Apply styles to specific elements by selecting elements with classes and ids
- Apply a set of styles to children of a specific class or tag
What is CSS?
If HTML is a set of instructions telling the browser what to display, CSS tells it how to display it.
CSS stands for:
- Cascading
- Style
- Sheet
It provides the browser with precise instructions on how to style each element we want displayed on the page and can affect the text format - like font, size, color - the size and position of various objects on the page, colors, spacial layouts, etc. There are literally hundreds of different properties we can use to style HTML elements on a webpage.
Let's write some CSS - Codealong
Create a new folder with a HTML page:
$ mkdir css-basics
$ cd css-basics
$ touch index.html
First, add a basic HTML structure to your index.html file:
<!DOCTYPE html>
<html>
  <head>
    <meta charset="UTF-8">
    <title>Intro to CSS</title>
  </head>
  <body>

  </body>
</html>
Adding CSS
There are three different ways to use CSS to style your HTML:
- External style sheet
- Internal Style sheet
- Inline style
Let's take a look at each one.
Inline CSS
If you're looking to add a unique style for a single HTML element, you can use an inline style. It can also be used to test different styles, initially, or for quick fixes, as it's much easier to change a single element on the page than to find and change the source CSS file.
To use inline styles, add the style attribute to the relevant tag. The style attribute can contain any CSS property. The example shows us changing the HTML body's background to red:
<!DOCTYPE html>
<html>
  <head>
    <meta charset="UTF-8">
    <title>Intro to CSS</title>
  </head>
  <body style="background:red">

  </body>
</html>
Open this HTML file in browser and let's see what we have - a red page!
Inline CSS has a lot of downsides, though, so try to avoid using it on your projects and during class.
Style Sheets
Style sheets can be written in your HTML (internal) or in a separate CSS file (external). Whatever style sheet you use, the CSS syntax is the same. We build our CSS with a selector - usually the name of the HTML tag, a specific class of elements, or an element with a unique ID:
selector {
  property_1: value_1;
  property_2: value_2;
}
Do not forget the curly brackets or the semi-colon after the value!
The last semi-colon can be omitted but it's optional.
Internal Style Sheets
If a single page has a unique style, you could use an internal style sheet - these are defined and written in your HTML using the <style> element, inside the head section of an HTML page:
<!DOCTYPE>
<html>
  <head>
    <style>
      body {
        background: black;
      }
    </style>
    <title>Intro to CSS</title>
  </head>
  <body>

  </body>
</html>
Just like before, if you open the index.html with your browser, you'll notice the body background has changed. We've selected the body element and instructed the browser to color it black.
External Style Sheets
With just one file - your external style sheet - you can modify the styles of your entire website. That's really powerful and helps keep your code organized and separate.
To link the stylesheet to the HTML file, inside the <head> tags, we need to add a self-closing <link> tag, indicating the type of relations (rel="stylesheet") and the file path. But first, let's create a css file within our css directory.
mkdir css
touch css/style.css
Then we can move the CSS from our internal style sheet to our external style sheet and add the file path (href="style.css") to our HTML file:
<!DOCTYPE html>
<html>
  <head>
    <meta charset="UTF-8">
    <title>Intro to CSS</title>
    <link rel="stylesheet" href="style.css">
  </head>
  <body>

  </body>
</html>
We often have a specific folder for stylesheets, as we can have several in one application, and we're doing that now with our /css folder.
We need to create a css file
touch style.css
And let's add some more html to our index.html:
<!DOCTYPE html>
<html>
  <head>
    <meta charset="UTF-8">
    <title>Intro to CSS</title>
    <link rel="stylesheet" href="style.css">
  </head>
  <body>
    <p>This is a paragraph element</p>

    <div>This is a DIV</div>
    <div>This is another DIV</div>
  </body>
</html>
Now, let's add the CSS we had - plus some more - to our stylesheet file:
body {
  background: red;
}

p {
  color: orange;
}

div {
  border-width: 1px;
  border-style: solid;
  border-color: black;
}
Our body rule is still applied, and these new rules will change the color of all paragraph tags to have the font-color "orange" and add a 1px black border to each DIV on the page, since the selector targets the "div" elements. Refresh your browser and check it out.
Luckily for us, CSS gives us some nice shortcuts that we'll go over throughout this lesson, and we can combine the div border styles into this:
div {
  border: 1px solid black;
  /*border-width: 1px;
  border-style: solid;
  border-color: black;*/
}
Notice, we can comment out CSS with `/* your css */.
Differences between Classes and IDs
The Class Selector
The class selector finds elements with a specific class, and as an attribute, class allows us to target several elements that may share similarities. Note that:
- Classes are NOT unique
- You can use the same class on multiple elements
- You can use multiple classes on the same element
- You can select a class using
.class-name {}
Watch me add some HTML to our index.html and then style those elements by selecting the classes associated with them:
<!DOCTYPE html>
<html>
  <head>
    <meta charset="UTF-8">
    <title>Intro to CSS</title>
    <link rel="stylesheet" href="style.css">
  </head>
  <body>
    <p>This is a paragraph element</p>

    <div>This is a DIV</div>
    <div>This is another DIV</div>

    <div class="comments">
      Hello
    </div>

    <div class="comments">
      Hello
    </div>

    <div class="comments">
      Hello
    </div>

  </body>
</html>
Now, for the style:
body {
  background: red;
}

p {
  color: orange;
}

div {
  border: 1px solid black;
}

.comments {
  font-weight: bold;
  color: #64FE2E; /* green */
}
If I refresh my browser, I see the updates. The browser selects all elements on the page with the comments class and alters the font-weight and color.
The ID Selector
The ID selector uses the id attribute of an HTML tag to find one specific element. We can give any name we want to our ID attribute, besides the obvious reserved words, such as tag names, etc.
- An ID is unique within a page.
- You should use the id selector when you want to find a single, unique element.
- In the CSS document, you use a hashtag (#) to denote an ID
How about we try it out? Altering the HTML:
<!DOCTYPE html>
<html>
  <head>
    <meta charset="UTF-8">
    <title>Intro to CSS</title>
    <link rel="stylesheet" href="style.css">
  </head>
    <body>
    <p>This is a paragraph element</p>

    <div>This is a DIV</div>
    <div>This is another DIV</div>

    <div class="comments">
      Hello
    </div>

    <div class="comments">
      Hello
    </div>

    <div class="comments">
      Hello
    </div>

    <section id="dolphin">
      I am a dolphin
    </section>

    </body>
</html>
And now the style:
body {
  background: red;
}

p {
  color: orange;
}

div {
  border: 1px solid black;
}

.comments {
  font-weight: bold;
  color: #64FE2E; /* green */
}

#dolphin {
  font-style: italic;
  color: #0040FF; /*blue*/
}
Sweet!
Multiple classes and multiple elements
You can also chain classes together, applying several classes to one element:
Let's add:
<!DOCTYPE html>
<html>
  <head>
    <meta charset="UTF-8">
    <title>Intro to CSS</title>
    <link rel="stylesheet" href="style.css">
  </head>

  <body>
    <p>This is a paragraph element</p>

    <div>This is a DIV</div>
    <div>This is another DIV</div>

    <div class="comments">
      Hello
    </div>

    <div class="comments">
      Hello
    </div>

    <div class="comments">
      Hello
    </div>

    <section id="dolphin">
      I am a dolphin
    </section>

    <p class="first second">Multiple classes</p>

    </body>
</html>
Then, create two classes:
body {
  background: red;
}

p {
  color: orange;
}

div {
  border: 1px solid black;
}

.comments {
  font-weight: bold;
  color: #64FE2E; /* green */
}

#dolphin {
  font-style: italic;
  color: #0040FF; /*blue*/
}

.first {
  font-size: 40px;
}

.second {
  color: red;
}
As we can imagine, the possibilities are endless. There are many properties and values to work with and many ways to target specific elements. Two pages could have the same HTML content, and yet look dramatically different due to different CSS stylesheets.
We can even use classes/IDs with elements to select and style HTML. Lets add a short unordered list:
<!DOCTYPE html>
<html>
  <head>
    <meta charset="UTF-8">
    <title>Intro to CSS</title>
    <link rel="stylesheet" href="style.css">
  </head>

  <body>
    <p>This is a paragraph element</p>

    <div>This is a DIV</div>
    <div>This is another DIV</div>

    <div class="comments">
      Hello
    </div>

    <div class="comments">
      Hello
    </div>

    <div class="comments">
      Hello
    </div>

    <section id="dolphin">
      I am a dolphin
    </section>

    <p class="first second">Multiple classes</p>

    <ul>
      <li class="why">Why a dolphin?</li>
      <li class="why" id="not">Why not?</li>
    </ul>
  </body>
</html>
Imagine, we wanted to particular style to apply to all of the elements from the list but wanted other particular styles to apply to each item, individually. Definitely doable. Take a look at our CSS:
body {
  background: red;
}

p {
  color: orange;
}

div {
  border: 1px solid black;
}

.comments {
  font-weight: bold;
  color: #64FE2E; /* green */
}

#dolphin {
  font-style: italic;
  color: #0040FF; /*blue*/
}

.first {
  font-size: 40px;
}

.second {
  color: red;
}

li {
  text-align: center;
}

li.why {
  font-family: sans-serif;
}

li#not {
  font-family: serif;
}
Now, all our list items are centered but the top item has a different font than the bottom.
Specificity in CSS
One of the most important concepts with CSS is specificity. Imagine you select an element by it's class and give it some style; then, on the next line, you select the same element by it's element name and it's ID - how does the browser know what style to apply? Well, every element gets a score and it's this score that dictates what CSS property is applied.
Every selector has its place in the specificity hierarchy, and if two selectors apply to the same element, the one with higher specificity wins. Overall, there are four distinct factors that define the specificity level of a given selector: inline styles, IDs, classes+attributes and elements. You can calculate CSS specificity with CSS Specificity Calculator:

Calculating specificity

This is calculated as 113
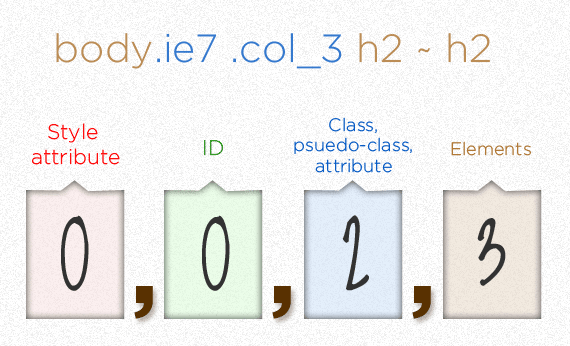
This is calculated as 23
![calc 4]](https://css-tricks.com/wp-content/csstricks-uploads/cssspecificity-calc-4.png)
This is calculated as 1000
A couple of rules to think about:
- If two selectors apply to the same element, the one with higher specificity wins
- When selectors have an equal specificity value, the latest rule is the one that counts
- When selectors have an unequal specificity value, the more specific rule is the one that counts
- Rules with more specific selectors have a greater specificity
- The last rule defined overrides any previous, conflicting rules
- The embedded style sheet has a greater specificity than other rules
- ID selectors have a higher specificity than attribute selectors
- You should always try to use IDs to increase the specificity
- A class selector beats any number of element selectors
-From SmahingMagazine.com
Conclusion
CSS can be really fun or a total nightmare. You have to remember a few rules, but once you have them remembered, it's great to see your webpage come to life as you imagined.
- Describe the differences between classes and IDs.
- Identify the popular CSS properities we used today.
- What are the use cases for inline styling vs. internal/external style sheets?